tattoos
Showing posts with label Home Decor. Show all posts

Saturday, October 2, 2010

ALONG CAME A SPIDER......

WELCOME FRIENDS! 
WELCOME OCTOBER!
NEW PUMPKINS FROM THE PUMPKIN PATCH
HAVE ARRIVED!
SPIDERS,  POLKA DOTS AND BATS..OH MY!

CELEBRATE THE SEASON!
IT"S A BEAUTIFUL TIME OF YEAR!
THE COLORS OF FALL ARE  EVERYWHERE!
EVERY PUMPKIN PATCH NEEDS
 A LITTLE BIT OF POLKA DOTS!
FROM MY HOME TO YOURS..

IT'S  FUN TO SEE WHERE EACH AND EVERY PUMPKIN GOES!
IT'S A JOY TO 
 CREATE A LITTLE PUMPKIN HAPPINESS FOR YOU!
OH, THE PLACES YOU'LL GO!
THANK YOU!

Come back and visit soon!

Monday, September 6, 2010

Welcome "BOO-TI-FUL" Friends!

Welcome to my Home!
The Season of Fall and Halloween Decor greets you!
Let's CREATE ANOTHER
"Boo-TI-FUL" Halloween Centerpiece...

Items to collect: 
Sculptured Vase or Container, Boo Sign, Fall Garland Wreath, Green Ivy Topiary
Add Topiary to sculptured vase,
add fall garland wreath around the sculptured vase
Add a "BOO" sign!  Beautiful Green Apples are great  too!
Simple!
Welcome "BOO"-TIFUL Friends to  your front door!
Bring in the Festive, Bright and Fun colors and fabrics of Halloween!
Enjoy!

Links: 

Monday, August 30, 2010

Children's Artwork

Welcome to a fun Mother/ Daughter craft!
Turn your Vintage Doll and Barbie clothes into artwork! I still have a few barbie clothes from my childhood.
How about you?

Tips:
1.  Use shadow box's or a frame with some depth.
2.  The scrapbook paper works well with the card stock weight.
3.  Adhere the Barbie clothes with double stick tape.
4.  For a retro style, you can paint polka dots onto the frames.
5. Be sure to date your frames for your daughter.
6. It is also fun to include the latest fashions of today. (A keepsake for the future)

Enjoy!

Thursday, August 12, 2010

Crafts for Everyone!

Welcome Smiles!
If you love paper crafting and everything pink, girly and CUTE-you will LOVE this craft.
A great project for little girls and young women!  The ideas of scrapbook paper, flowers, frames and jewels are endless!
Enjoy!
It's GREAT to be HOME again!
I've missed you all!
I have so many new projects to share!

Tuesday, August 10, 2010

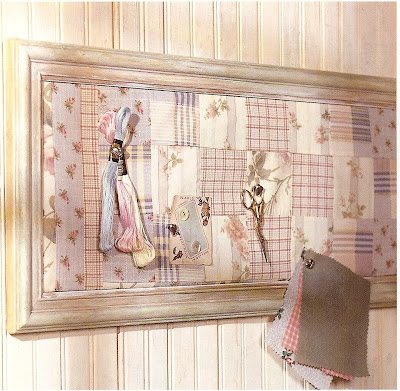
Quilt Bulletin Board


Hello friends! I have posted this bulletin board in the past, so it may look familiar to you. I have had many requests on how to make this Quilt Bulletin Board, so here you have the tutorial! This bulletin board is great for a sewing/craft room!

Items to Collect:

12" X 30" frame, acrylic craft paint, paintbrush, foam board, craft knife, 1/4" thick cork board, Spray adhesive, cotton batting, scissors, double-stick tape, piece of quilt fabric (fabric should be large enough to cover batting/cork/ foam-board insert, with extra fabric to allow for aligning pattern and wrapping to the back.) Picture points or brad nails, tacky glue, craft paper.

Let's get started!
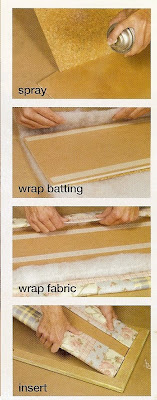
1. Paint frame with your color choice of paint, then dry Brush with white craft paint Let dry.

2. Remove and measure frame backing. Using a craft knife, cut a piece of foam board to those measurements. Our frame backing measured 9" X 26".

3. With craft knife, cut a piece of cork board to the same measurements.

4. Following the adhesive manufacturer's instructions, spray one side of both the cork and the foam board with spray adhesive(see "spray" photo).

5. With scissors, cut a piece of batting to a size large enough to cover the front of the foam and cork assembly, including excess to wrap and secure on the back.(see "wrap batting" photo).

6. Apply a strip of double-stick tape along each long side on the back of the foam board. Center the board-and cork assembly over batting, wrapping excess batting onto the back. Secure batting to the tape.

7. Apply another strip of double-stick tape along each long side next to the batting. (see "wrap fabric" photo)

8. Insert the fabric-covered board into the back of the frame. Secure with picture points or brad nails.

9. Finish the frame back by cutting a piece of craft paper to fit the frame. Glue the paper to the frame back.

10. Hang your beautiful quilt bulletin board!

11. Deck the Halls of HOME with JOY!

Wednesday, May 19, 2010

Deck The Halls Of Home With Joy


Welcome friends....As many of you know, this blog started out as "just for fun" Christmas inspiration. Happily, it has evolved into a place of friendship, laughter, inspiration, expression of creativity, crafting and more.

Thank you for following along! I have met so many wonderful friends! I hope you all feel welcome here and know your friendship is heartfelt.

Welcome to a favorite room in my home~the Dining Room. Like most families, we spend many special occasions, celebrations and Holiday dinners in this room. I am a mother of six- four are boys! I love having a formal dining room where my boys can see, feel and appreciate a sense of beauty. (A Mom can only try and I do try!).

I've alwys been inspired by the window treatments in the Armstrong Mansion (My Great Great Grandparents home-Francis and Isabel Armstrong.) Today it's a beautiful Bed and Breakfast Inn in Salt Lake City, Utah. A great place to celebrate an Anniversary!
My Dining Room has three large windows in front of the house that face south. When we were celebrating our first Thanksgiving a few years ago in our new home. I wanted our room to feel inviting. I also wanted it to be somewhat formal. I kept thinking of the Armstrong Windows.


I started dressing up the windows in fall colors and fall textures, they are my favorite colors to work with. I was decorating for Fall, but loved the colors so much they have stayed through all seasons.


1. I started with a grapevine swag that I placed horizontally above the shutters. The grapevine is anchored to drapery hooks.

2. I draped fabric (56" wide) 8-9 yards of brown textured fabric weaving in and out of the grapevine.

3. I embellished the brown fabric and grapevine with fall garland beads

4, Next, I Added a twist of ribbon to help secure and hold the garland into place.
I may add sheer or textured fabrics to the sides of the windows for a more formal look.


Enjoy!
I'm joining Creations by Kara!

Deck The Halls Of Home With Joy


Welcome friends....As many of you know, this blog started out as "just for fun" Christmas inspiration. Happily, it has evolved into a place of friendship, laughter, inspiration, expression of creativity, crafting and more.

Thank you for following along! I have met so many wonderful friends! I hope you all feel welcome here and know your friendship is heartfelt.

Welcome to a favorite room in my home~the Dining Room. Like most families, we spend many special occasions, celebrations and Holiday dinners in this room. I am a mother of six- four are boys! I love having a formal dining room where my boys can see, feel and appreciate a sense of beauty. (A Mom can only try and I do try!).

I've alwys been inspired by the window treatments in the Armstrong Mansion (My Great Great Grandparents home-Francis and Isabel Armstrong.) Today it's a beautiful Bed and Breakfast Inn in Salt Lake City, Utah. A great place to celebrate an Anniversary!
My Dining Room has three large windows in front of the house that face south. When we were celebrating our first Thanksgiving a few years ago in our new home. I wanted our room to feel inviting. I also wanted it to be somewhat formal. I kept thinking of the Armstrong Windows.


I started dressing up the windows in fall colors and fall textures, they are my favorite colors to work with. I was decorating for Fall, but loved the colors so much they have stayed through all seasons.


1. I started with a grapevine swag that I placed horizontally above the shutters. The grapevine is anchored to drapery hooks.

2. I draped fabric (56" wide) 8-9 yards of brown textured fabric weaving in and out of the grapevine.

3. I embellished the brown fabric and grapevine with fall garland beads

4, Next, I Added a twist of ribbon to help secure and hold the garland into place.
I may add sheer or textured fabrics to the sides of the windows for a more formal look.


Enjoy!
I'm joining Creations by Kara!

Thursday, April 1, 2010

Welcome Friends!


Sending you all a bouquet of beautiful flowers to CREATE for your dining room table!
Start with a large-mouth clear cookie jar or canister and place a clear drinking glass in the center. Gently stack dyed, hard-cooked eggs between the glass and jar, alternating egg colors. Fill the glass with water. Cut the stems of your favorite flowers (we used roses, gerbera daisies, tulips, hyacinth, and bells of Ireland) to the desired length, and arrange them in the glass. Inspired by BHG
(You can find the large clear glass cookie jars at Walmart and Hobby Lobby).

A few SPRING projects from my HOME to yours~ WELCOME SPRING!


Wishing You All A Happy Easter!

Welcome Friends!


Sending you all a bouquet of beautiful flowers to CREATE for your dining room table!
Start with a large-mouth clear cookie jar or canister and place a clear drinking glass in the center. Gently stack dyed, hard-cooked eggs between the glass and jar, alternating egg colors. Fill the glass with water. Cut the stems of your favorite flowers (we used roses, gerbera daisies, tulips, hyacinth, and bells of Ireland) to the desired length, and arrange them in the glass. Inspired by BHG
(You can find the large clear glass cookie jars at Walmart and Hobby Lobby).

A few SPRING projects from my HOME to yours~ WELCOME SPRING!


Wishing You All A Happy Easter!
 

blogger templates | Blogger